
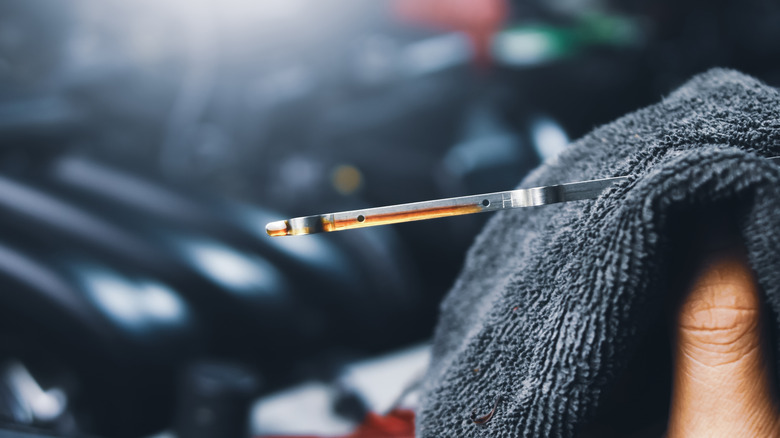
It sounds like a basic procedure — pull the dipstick, check the oil level, and top off if needed. However, if that is your whole game plan, you might be missing what the dots and lines on that metal stick are actually telling you. You see, those markings are not just for decoration. They are calibrated indicators that help you avoid overfilling, underfilling, or causing serious damage to your engine. Many drivers get this wrong, especially when they check the level too soon, on uneven ground, or misread the difference between hot and cold readings.
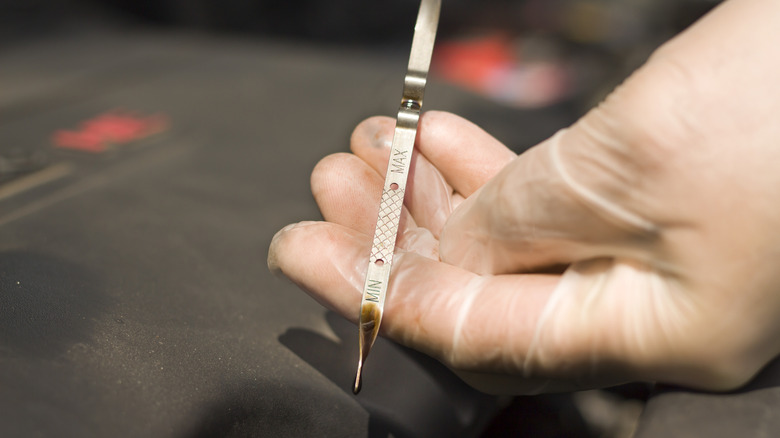
Every dipstick has its own markings, but generally, the top dot means full when the engine is warm, and the bottom one means you’re low, add oil. Some manufacturers will stamp an “F” and an “L” for full and low while some will simply have a hole punched in along with a cross hatched section or variations of these.
So what about the space in between? This section typically accounts for around one quart of oil. If the reading is just above the bottom dot, that usually means you are about a quart low. Topping up, however, should be done carefully. Why? It’s simple — too much engine oil can be just as harmful as too little.
How to read it right and avoid rookie mistakes
First things first, make sure the car is parked on level ground. Checking on a slope can give you a false reading and lead to an unnecessary top-up. Let the engine sit for five to fifteen minutes if it is hot, as this will allow the oil to drain into the oil pan for an accurate reading, and be smart about adding engine oil to a hot engine. Pull the dipstick, wipe it clean with a rag or paper towel, then reinsert and pull it again for the true reading. Do not rely on the first swipe. Residual oil can give a misleading result.
The dots or crosshatch patterns at the end of the dipstick tell the story. If your oil level is between the bottom and top marks, you are within the ideal range. Below the bottom mark means the engine is low on oil and more needs to be added. If the oil film is above the top marking then the engine has too much oil and the excess needs to be removed.
Why accuracy matters more than you think
Using a dipstick correctly helps maintain the correct oil pressure, keep internal temperatures stable, and helps to ensure that every moving part stays lubricated. Running below the low mark reduces the oil’s ability to absorb heat and increases friction between components leading to overheating or worse, damage to components like bearings, cylinder walls and camshaft. If your oil light flickers during braking or cornering, you are likely too low.
Too much oil is not harmless either. Overfilling creates aerated oil, full of tiny air bubbles, reducing the oil’s lubricating and cooling properties. Bearings need a solid film of oil to work correctly, not foam. Oil pressure can increase because of overfilling engine oil and this will put more stress on seals and gaskets accelerating their wear.
The takeaway is simple. Check your dipstick regularly, do it properly, and respect what those markings tell you. Just in case your car is fairly modern, you may not have a dipstick in the engine bay, in which case your car will digitally measure the engine oil and tell you if the engine oil is outside the normal range. You could’ve skipped this article entirely, but on the brighter side, now you know more to help others out. Although, can you trust that digital oil life monitor?
Whatever the case may be, maintaining the correct engine oil level is important and the markings on a dipstick are not optional guidelines. They are your front line of defense against damage that starts small and ends with a big repair bill.
